


“The 3 Step Guide to Creating Pinterest-friendly Graphics for Your Blog” plus 1 more |  |

| The 3 Step Guide to Creating Pinterest-friendly Graphics for Your Blog Posted: 18 Dec 2012 12:04 PM PST It´s well established that Pinterest can be a strong driver of traffic. We´ve been having a lot of success at our Digital Photography School account and have seen other blogs, like Hair Romance, experiencing similar success. In my experience, most bloggers focus on curating boards to build their expertise and drive traffic back to their blogs. They regularly include their blog posts among the images they pin. This is great for attracting new visitors. There is, however, an easier way. You can save time and test whether your content will be shared on Pinterest by creating specific graphics for your blog posts. This simple method allows you to know if your blog and images resonate with users. The most basic form is a title and a graphic. In this post, I´ll walk you through my three-step process for creating images that are Pinterest-bait. Also, I´ll be doing a follow-up post highlighting bloggers using Pinterest successfully, so let me know if you have any suggestions for that in the comments. Step 1. Choose the size of your graphicSizing is an important issue. You want the graphic to be clear when it’s viewed as a small image. Additionally, you want the graphic to match the design of your blog. From a visual perspective, I prefer it when the graphic is the same width as the blog post. A great example is the image at the end of this post on Expert Photography. The best shape is either a square or tall image. Dan Zarella´s research shows that taller images get repinned more often. I agree with this, but mostly because you can fit more text in a longer graphic. The size of the graphic will depend on a lot of variables such as your blog design and how much attention you want to give to branding or calls to action. I recommend that you look at relevant images and take note of the sizes that appeal to you. Visit the original blog posts and see whether the graphics fit with the theme. Here are some example images on the original blog posts:
Tip: List posts and series do really well on Pinterest. Step 2. Choose the design elements and fontsThe best graphics are ones that have a similar template. I can look at pins from Elizabeth Halford and instantly know when one is from her blog. You want this kind of recognition and consistency. It means that people are more likely to trust you and repin the image without reading the associated article. I love it when the image matches contains similar elements from the blog design. Examples include:
The goal is for you, or a designer, to create a template that you can use for all of your graphics. You want to be able to make minor tweaks and get a new, pinnable image in just a couple of minutes. Additionally, you need to consider the following:
This is the hardest part of creating Pinterest-friendly graphics. Step 3. Add images and titleThis is the easiest step, and the one that you will be repeating every time you write a new blog post. You simply have to add the title and, if necessary, an additional image in Photoshop. If all of this sounds too complex, I recommend reading How To Create Pinterest Friendly Images. It contains a simply tutorial to create basic images. Extra ideasCreate graphics for your Resources page
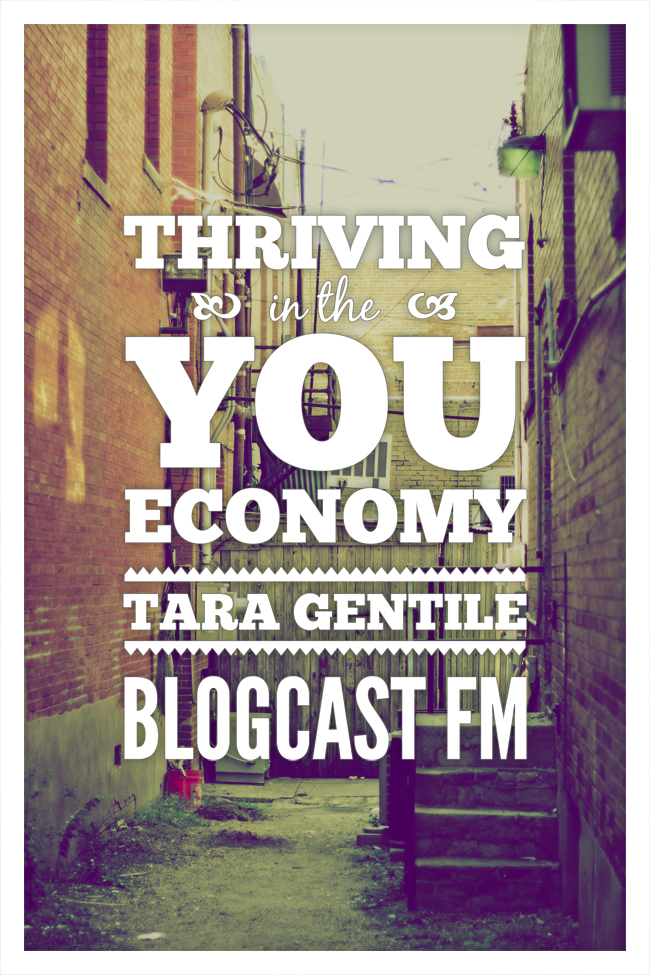
To really excel at this, the page needs to have a title that is more catchy than Recommended or Resources. Look at what Bree, from Blog Stylist, has done. She created a graphic for her page titled A-Z of blogging resources. This title is much more likely to be shared. Posts that have numbers in them—especially list posts—do extremely well. However, that approach may not work if you are regularly updating you Resources page. Add pinnable graphics to older postsThis is an idea that isn´t used by many bloggers. People will create graphics for their newer posts but will rarely revisit their archives. There is a lot of potential for Pinterest traffic here. Tutorials are extremely popular. Check out this example from BlogcastFM. It´s really simple—just a couple of nice fonts over a photo. It takes a good eye to get the elements working together like this but it is something that anybody could achieve with a bit of practice. Do you have any pillar content sitting in your achives? Revisit it and check to see if it has already been pinned. Also check to see if people have pinned similar articles from other blogs. This will let you know whether the topic will resonate with Pinterest users. I´d focus on creating graphics for the posts that have the most demand. This will give users the tools they need to share the post, and image, further. Use quotesPeople love pinning motivational quotes and images. This is also one of the easiest ways to find material for graphics. Go through your previous posts—especially the more popular, thought-provoking posts. Look for feedback on the sentences and phrases that people resonated with. Some people have even identified these and highlighted them so that people can tweet them easily. Colin Wright, from Exile, has created a page featuring images of his most popular quotes. He added an extra income stream by making these images available on T-shirts. Create infographics based on blog posts
Occasionally, you will have a post that would be perfect for an infographic. This if often a list post. It can take a bit of work to create the infographic, and for many bloggers, it may be beyond their budget or technical expertise. It does, however, give the post a chance to go incredibly viral. Check out the post that I referred to in that quote. The 10 Commandments of Using Pinterest for Business went viral on many networks because it was a comprehensive, well-written post. It went absolutely crazy on Pinterest: it felt like that graphic was haunting me for weeks! That´s how powerful it can be. Over to youAre you thinking about using any of these techniques? Do you know of any bloggers who are doing this to builds their visibility on Pinterest? Let me know in the comments. Originally at: Blog Tips at ProBlogger The 3 Step Guide to Creating Pinterest-friendly Graphics for Your Blog    |
| The Blogger’s Guide to Cutting Your Losses Posted: 18 Dec 2012 06:08 AM PST I don’t know whether it’s a coincidence, but as we near the end of the year, there seem to be a few bloggers talking about what you should do if a past passion no longer inspires you, or your next big idea’s already been done.  Image courtesy stock.xchng user mmagallan Now is a good time to take stock—I know I’m not the only one who has a look back over the year in December, and makes new plans in January. So I thought it might be valuable to talk today about cutting your losses. What are losses?You might be tempted to think of losses in terms of passion (things you no longer have an interest in) or lost opportunities (ideas you want to pursue but can’t, because of other commitments). But there are other losses. One is dollars. If you’ve monetized your blog, and you are making money from blogging, you might find it difficult to work out the monetary value of lost opportunities, or money you’ve left on the table through poor execution or planning. The other big consideration is lost opportunities around and beyond your blog. These can play into the question of income—perhaps a project you’re busy working on caused you to forfeit another opportunity that could have stepped up your income this year. The question we, as bloggers, need to ask ourselves is whether that other thing we were working on is worth that lost opportunity. Are the gains we’re making with that other project worth it? If not, it might be time to consider cutting your losses. What should we cut?Only you will know the parts of your life as blogger that feel like chores, that are overwhelming, or that don’t seem to add to your life no matter what you try. Importantly, as Yaro’s story points out, sometimes cutting your losses has to be done in advance. You have a great idea, but then you find out the competition is really very tough, or someone’s already done what you’d planned to. That may mean that developing the idea isn’t worth the effort. But only you can tell if that’s true. I tend to cut the things that don’t give me energy to keep doing what I’m doing. I always have a lot on the go, so that makes it pretty easy to tell what’s gaining momentum, and what’s not. It’s easy to look at reader stats, or income statements, or even just how I feel about tackling a project, and know if I think it’s worth doing. But sometimes, ideas that have been very popular can actually be difficult to convert into money-makers. For a pro blogger who’s relying on income to keep a roof over her or his head, those ideas can be the hardest—and the most necessary—to let go of. If you’ve given everything you have to making a project a success, yet you just can’t make that traffic convert, you might need to think of cutting that project from your schedule and focusing on the areas of your work that are helping to support you. Is now the time?It seems obvious that once you’ve worked out that you need to cut a project, you should just do it. But I don’t know that this is always the right approach. Think about selling a house. You might decide you’d like to move somewhere else, but you might also know that houses in your area sell better in Spring. So perhaps you decide to wait until then before you list and sell your home. The same goes for blogging. I was in touch with a blogger recently who’s decided to sell a blog, so he’s spending three months building it up to be the strongest he can make it, to maximize his sale price. So the on-the-spot cut isn’t always the best idea. That said, there are times when it will be. If it’s an ongoing project (rather than a bright idea you wanted to pursue), it’s important to work out an exit strategy for that project. Simply dropping it might not be the answer. Abandoning projects you’ve been working on means writing off the time you’ve put into them. By carefully reviewing what you’ve developed, you might be able to find ways to reuse some of that work in a way that gives you the greatest possible benefit. That might mean backing up a cool WordPress theme you had specially developed before you take a blog offline, or asking contacts you’ve met through an ultimately unproductive project to help you with something else you’re working on. Whatever you do, try not to just cut something and run. The best endings are the ones where we learn and gain from our experiences. Looking back over the year, have you got losses you need to cut from your blogging work? I’d love to hear what you’ve been thinking in the comments. Originally at: Blog Tips at ProBlogger The Blogger’s Guide to Cutting Your Losses    |


| You are subscribed to email updates from @ProBlogger To stop receiving these emails, you may unsubscribe now. | Email delivery powered by Google |
| Google Inc., 20 West Kinzie, Chicago IL USA 60610 | |


0 comments:
Post a Comment