Ads 468x60px

How to Comment on Blogs the Right Way: The Five Steps You Need to Follow - DailyBlogTips

How to Comment on Blogs the Right Way: The Five Steps You Need to Follow - DailyBlogTips


How to Comment on Blogs the Right Way: The Five Steps You Need to Follow

Posted: 11 Jul 2014 06:41 AM PDT

Are you commenting on other people's blogs to grow your own readership?

This is often a good strategy when your blog is brand new – and it's a great way to start building relationships in your niche.

Too many bloggers, though, go about commenting the wrong way.

If you leave comments that don't say much more than "great post!" then you're wasting your time (and everyone else's).

Here's how to develop an effective commenting strategy:

#1: Think Quality, Not Quantity

Don't treat commenting as a numbers game. It's far better to leave five thoughtful, insightful comments than fifty quick-fire ones.

If your comments:

  • Are only semi-relevant to the post.
  • Make it clear you didn't even read the whole post.
  • Are full of spelling mistakes and typos.
  • Or simply come across as very superficial

… then there's a high chance they'll end up stuck in a moderation queue, deleted, or even marked as spam.

#2: Choose a Few Blogs to Focus On

While it's good to follow quite a few blogs in your niche, so you know what other people are writing about, it's best to pick just a handful to focus on when you're commenting. Three to five is about right.

That way, you can comment (thoughtfully) on most of the posts that those blogs put out, which will mean that other readers – and the host blogger – quickly start to recognise your name.

You don't necessarily have to focus on the biggest blogs in your niche. In fact, you may well find you get more traction from blogs that get (say) 10 comments per post rather than 100, as your comments will be more visible.

#3: Try to Get In Early

On large blogs in particular, the first few comments will, naturally, be the ones that get read the most. By keeping an eye on your RSS feed at the times when your target blogs typically post, you'll have a good chance of getting your comment in before the discussion has gone far.

You can overdo this – if you're the very first commenter on every single post on a blog, it might look like you're trying to dominate the conversation. (Or it might just give the impression you have no life!)

#4: Say Something Relevant and Interesting

Rather than writing something very general, be relevant and interesting. Your comment doesn't have to be really long (a sentence or two is often enough), but it should add value to the post and the conversation.

Here's an example of a bad comment:

This is a good informative blog I came across for writing some good blog posts which can attract more readers…

It's generic, it doesn't really say anything, and it's not even very well written.

Here's an example of a really good comment. This one's from Raspal Seni, commenting on David Master's guest post a few days ago. He's been leaving consistently great comments on DailyBlogTips for months (thanks, Raspal!)

Hi David,

Nice advice. Nowadays, the 5 seconds has been shortened to 2 seconds. I read this at some blogs and heard it in webinars too. So, I made my main blog load under one second.

There's another tip I read which says if you have short 2-3 line paragraphs at the stat of you post, more people are likely to read the post. They don't like long paragraphs at the start of your post.

I like 1 and 2. Long long ago definitely makes the ears stand and gets us curious to listen to the whole story. Making our post like a story is a great art and trick.

And, not to forget the importance of great headlines.

Raspal suggests a correction to a statistic David uses (though he does this in a polite way), and he offers a new tip about using short paragraphs at the start of a post.

#5: Use Your Real Name

Almost every blog "no-follows" comments, so there's absolutely no SEO reason to use a keyword for your name when leaving a comment.

Most blogs will delete comments with "names" like "Pay Per Click Marketing" or "keston boiler repairs London" or "night clubs" (just a few spammy comments we've had recently!)

Use your actual name, not the name of your blog, or a keyword related to your business. If your comment is interesting and useful, readers will click on your name to find out more about you.


Those are my tips … but I'm sure you have more to add. Leave a comment below (following the advice above, naturally ;-)) to share your ideas.


Wanna learn how to make more money with your website? Check the Online Profits training program!


“5 Key Elements for a Successful Women’s Blog” plus 1 more

“5 Key Elements for a Successful Women’s Blog” plus 1 more

Link to @ProBlogger

5 Key Elements for a Successful Women’s Blog

Posted: 08 Jul 2014 08:52 AM PDT

Image via Flickr user Liquine

Image via Flickr user Liquine

This is a guest contribution by Renee from Beautifille.com

This year marks 10 years of my blogging career, and after starting several women's blogs (some successful, some not), and being an avid reader of them myself, I've learn the key elements in what makes a blog "make it" or not. Here they are.

Key #1: Make Sure Your Blog is Visually Great

I usually try not to generalize, but let's face it: women like pretty things. We notice, pay attention and are attracted by how something looks. Having a good blog design is vital because at the end of the day, your blog design and layout is the first impression for a reader (who is very happy to click that X button right away). 

So what makes a good-looking women's blog? In my opinion, it's simplicity with a feminine touch. A minimalist layout with pinch of feminine color palettes work very well (lilac, reds, pinks and pastels), as shown in these top blogs for women:

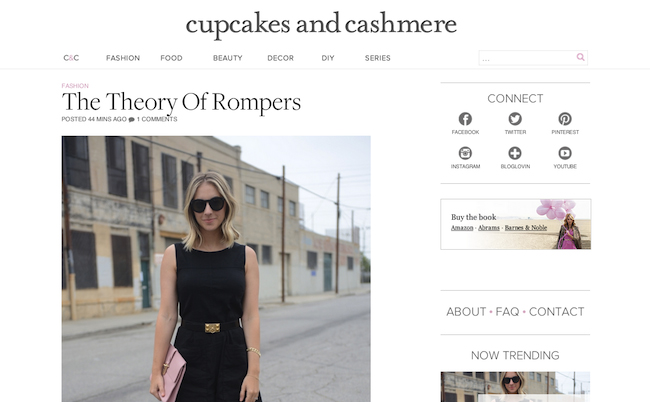
cupcakes-and-cashmere-blog

Cupcakes and Cashmere has a very clean white, gray and pale pink color scheme.

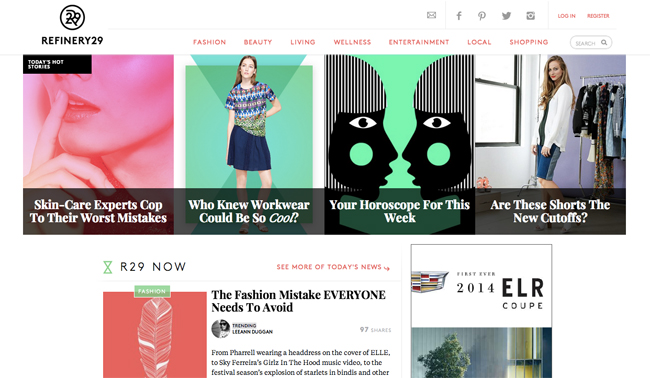
 refinery29-blog

Refinery29 has a bold yet feminine look with a color scheme of black, white, mint green and salmon pink. 

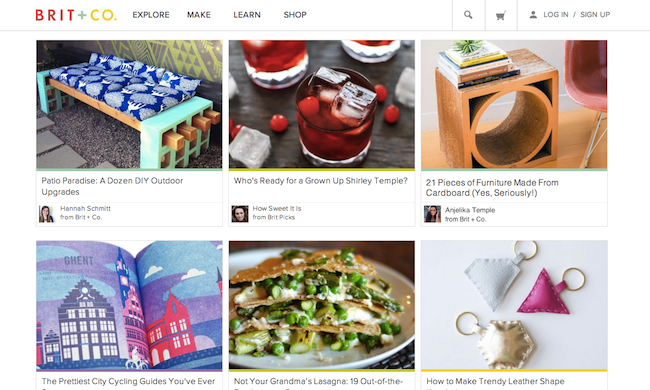
brit-co-blog

Brit.co also has a clean site with subtle primary colors, keeping her site light and airy. 

The second thing that makes a blog look great are the photos. Great photos will go a long way on blogs, but even more if your audience is women. Always start your blog post with a nice, attractive photo, and make sure your photos are big; small photos do not capture attention enough in my opinion. Your photo don't have to look super-professional or "glossy" like in fashion magazines (mine never are) but make sure they are visually attractive; i.e. no blurriness, basic composition and bright, good colors (this can be edited on your computer). Picmonkey.com is a great free service that many of the top women bloggers use to make your pictures visually better. It allows for cropping, color correction, and sleek layouts.

Key #2: Find your "niche women demographic"

Sure, "women aged 16-24" is a demographic, but rather than age, I found it best to have a "niche women demographic" – find your group of women (or your "tribe", as they say these days) within that fashion community. For example, you could be a denim fashion blogger. Or a punk-rock fashion blogger that writes about edgier stuff, or an "indie" fashion blogger. Likewise, instead of just another beauty blog, make it a cruelty-free beauty blog or an "over 40 women's beauty blog." Finding an even tighter niche than just "all women"; will allow you to properly find an even tighter community and thrive in that area. Not to mention, this is also great for branding your blog. 

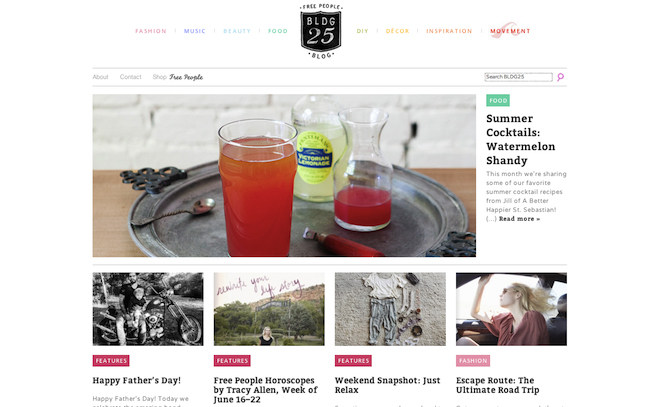
free-people-blog

Free People's blog does this well: their blog covers a range of topics, but for a certain type of girl: one who lives a "care-free", natural, Earthy lifestyle. 

Key #3: Offer value to your readers

This is a continuation from the point above, but in your niche demographic, you should still strive to not be like everyone else. It's important in this day and age in the blogging world – because there is literally millions of competition – to offer value to your readers. Personal style posts are great, but they're a dime a dozen these days, and after awhile, people get bored. Same with beauty blogs that just review a product in every post. Make sure to not only show your outfit posts or beauty posts but also offer something of value. Share your personal style tips with your posts, offer honest thoughts on the product, or give personal shopping recommendations on where to get the best bargain. You need to stand out, offer value and make your site different than the others. 

Key #4: Present information clearly

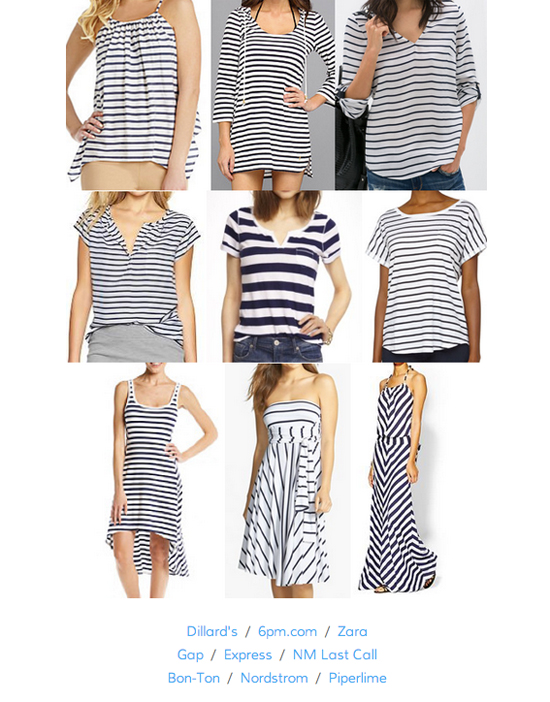
Shopping posts make up a fair bit amount of blogs for women no matter what the niche (what women doesn't love to shop?), so make sure your "shoppable" posts are done right. Keep them clean and easy to see. Personally, for my shoppable posts, I number the items in the collage clearly (make sure there are no fancy artist work, fonts, or cluttered images pasted together) and number the links immediately underneath. Also, I link to shops that offer international shipping so it's even easier for my readers. 

 js-everyday-fashion

A blogger who does shopping posts well is J's Everyday Fashion. As shown above, there is nothing else to distract from clearly showing the reader what she is clicking through, and from where. 

Key #5: Stay away from the drama

It happens with every niche, but I have witnessed some not-so-favorable behavior behind some women bloggers. After all these years I've managed to keep myself out of it, which would be my tip on taking your blog to the next level: just stay out of it. There is nothing that will make your blog (and "brand") look unprofessional and gain a bad reputation than getting involved in drama, gossip or cliques. Stay out of it, and watch your words too: no "bitching" or complaining (even passive aggressively) on blog posts or social media. This is especially vital with negative comments you may receive – do not lash back or be rude. Always be graceful with all your dealings on your blog, whether it's on the front page or behind the scenes. 

Renee is the creator of Beautifille.com, a beauty & self-improvement lifestyle site for women. Subscribe for free emails to learn how to improve your confidence, build your true, inner beauty and get the best “naturally you” beauty and style tips.

Originally at: Blog Tips at ProBlogger
Build a Better Blog in 31 Days

5 Key Elements for a Successful Women’s Blog

2 Simple Ways to Customise Your Facebook Updates

Posted: 07 Jul 2014 08:27 AM PDT

Today I want to share a Facebook tip that I’m sure many ProBlogger readers will already know, but which I am sure some have not heard about. Every single time I share it, I get “wow, I never knew that!” comments.

It’s all to do with how Facebook lets you customise your status updates when sharing links on your Facebook page.

OK – so here’s what happens when you add a link into the status update on your Facebook page before you hit ‘post’.

Digital Photography School

You can see Facebook has found an image that it thinks that you should use, has pulled in the page title and put it as the title under the picture and has taken the first couple of lines to put under that as a description of the post.

Of course you can change the image by hitting the little arrows in the top left of the image to show other options Facebook pulls in or use the ‘upload image’ to add a completely new image.

Digital Photography School

Most people know how to change images but some don’t know you can also change the title and description of the post. It’s simply a matter of clicking the title or description area.

Here’s what happens when you click the title just under the image:

Digital Photography School

Click the title and you now have an editable field that lets you change the title. In the case of links from dPS, I usually delete the name of the site so that only the post title remains.

Sometimes however I will try a different title that I think might be more shareable on Facebook or shorten longer titles so they don’t go over two lines.

The same thing can be done with the description area under the title. Click anywhere on that paragraph of words and an editable field opens up like this:

Digital Photography School

Again – you can put anything you like in here. This is particularly helpful when your first line is useful for the post but isn’t really descriptive of what the post is or if you want to use the description to boost curiosity of your Facebook followers.

I know many of you already use these features but like I said – many seem to have missed the ability to use them so I thought it might be a good tip to share.

Originally at: Blog Tips at ProBlogger
Build a Better Blog in 31 Days

2 Simple Ways to Customise Your Facebook Updates